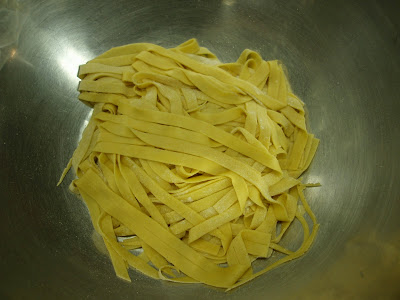
This week in class we made our own pasta. It is a relatively simple process with surprisingly few ingredients and equipment. However, because it is also hands-on and messy, we were unable to take many photos!
One thing to know is you do not have to have a pasta roller like this one, in order to make your own noodles:
It is also fun to roll out the dough with a good, old rolling pin and cut the strips with a pizza cutter or knife. We got the chance to do it both ways in class, and you can see in the first photo at the top, how wonderfully delicious the hand-cut version looks (and tastes)!
Do keep your eye out for one of these pasta roller/cutters, however, at garage sales and flea markets. I was able to pick this one up for only $5. Also, you may want to ask around to friends and neighbors. Many people have these stashed away, seldom used, and they are more than happy to lend them out. It may inspire them to give it a try, or join you for a pasta-making party.
Marcella Hazan has wonderful books on the classic Italian methods of cooking, and I refer to Marcell's Italian Kitchen
whenever making fresh pasta.
According to her, the dough for homemade pasta consists of flour and eggs, nothing else.
To produce approximately 3/4 lb of pasta (or 4 small servings), begin with
1&1/2 cup flour (unbleached, all-purpose)
and 2 eggs.
The exact ratio will vary depending on the size of the eggs, their flour absorption capacity, and even on the humidity of the environment. Therefore, Marcella suggests the following method of combining ingredients:
-Pour the flour onto a work surface.
-Shape it into a mound.
-Form a deep hollow in its center, like a bowl to hold the eggs.
-Break the eggs into the hollow.
-Beat the eggs lightly with a fork as though you were making an omelet. Draw some of the flour over the eggs, mixing it, a little at a time, until the eggs are no longer runny.
-Draw the sides of the mound together, pushing to one side any flour you think you may not use.
-Work the mixture of flour and eggs with your fingers and the palms of your hands until it is well combined. If it is still too moist, work in more flour as needed.
-Put the dough to one side and scrape the work surface clean of all loose or caked bits of flour.
KNEADING THE DOUGH:
Push against it with the heel of your palm, keeping your fingers bent, fold it in half, give it a half turn, press hard again and proceed like this for about 8 more minutes.
(I liken it to giving the dough a muscle massage!)
Note: If you are not sure that you have put in enough flour, push a finger into the dough as far as its center. It should come out clean and dry. If it is moist or sticky, sprinkle on some more flour and work it into the dough.
Now wrap the dough in plastic to keep it from drying as you prepare to cut and cook it.
Bring a large part of salted water to a boil on the stove as you are cutting your pasta. Have a pasta grabber (or tongs, or a fork) ready nearby, as well as some olive oil (or warm pasta sauce).
If using a hand-cranked pasta cutter, as in the photo above, divide your dough ball into four equal pieces.
Set the thinning rollers at their maximum opening. Flatten one of the pieces of dough by hand and run it through the machine. Fold it in thirds, give it a quarter turn, and pass it through the machine again.
Repeat this two more times.
Close the rollers one notch and run the dough through. Do not fold it anymore.
Run it through once on each subsequent notch until it is the desired thickness.
NOTE: Be careful to dust it with flour, if the dough becomes sticky at any point in the thinning process.
We then cut these long strips in half to make it easier to feed them through the cutting rollers.
Fettucini was the size of noodle done in class, but your shape/size preference is up to you!
If rolling dough out without the use of a machine, remember to sprinkle the table and rolling pin with flour. However, only a light dusting, so that you do not make your dough too tough.
This method takes muscles and patience.
Firmly press and roll the dough into a long rectangle(-ish) shape.
It takes a while to get it thin enough, but you will want to see light through your sheet of dough when lifted.
Use a knife or pizza cutter to cut into strips.
COOKING THE PASTA-
Drop the pasta into a pot of boiling salted water. Immediately stir it and separate it to keep it from sticking together. Stir frequently while it is cooking, for about 2 to 3 minutes depending on it's thickness.
Have a bowl of warm pasta sauce or some olive oil ready to put the pasta in after draining. In class we ate ours after tossing it in butter melted with garlic, salt, pepper and olive oil.
HAVE FUN & GET MESSY!


