Friday, February 26, 2010

Apple-Berry Crumble

crumble

Fruity, bubbling, warm out of the oven with a sweet, buttery topping.
Add a scoop of vanilla bean ice cream, and you just might survive another damp February day here in the Northwest!


ingredients-
to make a 9"pie pan, serving 4-5

filling:

4 granny smith apples: peeled, cored, and cut into two-inch pieces
1 lemon: zested and juiced
1/4 cup white sugar
1 tsp cinnamon
1 cup mixed berries (or berries of your choice!)
-------------------------

topping:

1 cup flour
1 cup brown sugar
1 tsp salt
8 Tbsp (one stick) butter

{try substituting 1/2 cup whole wheat flour, oats, or nuts for half of the flour}


First, zest the lemon.  If you do not have a hand zester, use a fine grater.
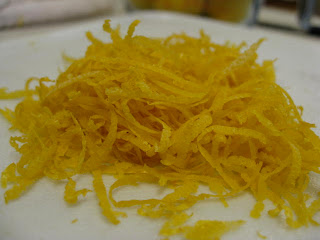


You will not get THIS MUCH zest from one lemon.  This was the amount we used for two classes!


Next, peel, core and cut the apples


Toss with lemon zest, juice, cinnamon and white sugar


Let this sit and marinate (to dissolve the sugar) while you make the topping.


Combine dry ingredients.

Cut butter into small pieces.


Add butter to dry ingredients and cut into small clumps, using fingers, pastry cutter, or butter knives.


In a buttered baking dish, add apples and berries.   Pour crumble topping over, and bake at 375 for 20-30 minutes, or until topping is brown and berry juices are bubbling.


****Special thanks to Allie and Lucie for taking fantastic photos, and providing help to us all before, during, and after class each week!!!  We couldn't do it without you.


Friday, February 19, 2010

Crackers


homemade crackers


1  cup all purpose flour
1  cup whole wheat pastry flour
1 teaspoon baking powder
1 teaspoon salt 
3 tablespoons olive oil
2/3 cup water
Pre-heat over to 450 degrees.
Combine the flours, baking powder and salt in a bowl. Add the olive oil and water and stir until you have a cohesive ball of dough (you’ll need to use your hands to really get it all together). 
Divide dough ball into three.  The dough can keep in the refrigerator if you wish to bake off only a third today, then make some more later.  Put one ball on a parchment-covered cookie sheet and roll it out very thin.  Sprinkle with flavorings (salt, herbs, seeds, parmesan, etc).  In class today we used SPIKE natural gourmet seasoning.
Use a pizza cutter to slice the dough into squares or diamonds.  The elasticity of the dough will make the crackers shrink slightly and pull away from each other;  this makes them easy to bake without sticking together.
Bake for 10-12 minutes, until golden and crisp.  They will get a bit crisper as they cool.
Let the crackers cool completely and then store them in an airtight container. If you don’t eat them all up, they’ll last at least a week on the counter.
Each recipe makes between 40-50 crackers, depending on how small you make your cuts.


Thursday, February 11, 2010

Scones


The ideal scone should be crisp outside and flaky inside; it should not be cake-like in texture. Scones are made from a few simple, basic ingredients, but it’s the way those ingredients are worked together that separates the ordinary from the exceptional scone.  The key to flaky scones is to mix the dough as little as possible, keeping the butter in large chunks.  Using cold butter helps to keep it from blending too much with the flour, thus allowing it to melt and bubble its way through the dough once put into a hot oven.


Ingredients:
2 cups all-purpose flour
1/3 cup granulated sugar
1 Tbs. baking powder
1/2 tsp. table salt
1/2 cup dried currants (optional)*
3 oz. (6 Tbs.) cold unsalted butter, cut into cubes
3/4 cup heavy cream
2 large egg yolks, lightly beaten
For finishing:
small bowl of extra cream to brush on before baking
small bowl of sugar to sprinkle on before baking

* a note about currants:
In class today, we discussed currants.  Many children were not yet familiar with them.  They are the traditional scone filling, but we talked about other possibilities such as dried cherries, chocolate chips, craisins.  The currants you will find in the store are actually dried "Black Corinth" grapes, smaller than raisins, and NOT the currants which are the berry of bushes right here in Washington.

To make the scones:
Position an oven rack in the lower third of the oven and heat the oven to 400°F. Line a heavy baking sheet with parchment. In a large bowl, whisk together the flour, sugar, baking powder, and salt. Add the currants, if using, tossing until evenly distributed and coated with flour.


Cut in the butter with a pastry blender or two table knives until the largest pieces of butter are about the size of peas.


In a small bowl, stir the cream and egg yolks just to blend. Add this all at once to the flour mixture.

 Stir with a fork to begin combining the wet and dry ingredients and then use your hands to gently knead the mixture together until all the dry ingredients are absorbed into the dough and it can be gathered into a moist, shaggy ball.


Don’t overknead: This dough is sticky but benefits from minimal handling. Set the rough ball in the center of the prepared baking sheet and use lightly floured fingers to gently pat the dough into a disk about 1 inch thick and 7 inches in diameter. Do not worry if the dough doesn't look smooth- a rough, lumpy dough means tender, flaky scones.  Don’t be tempted to make the round any flatter.


With a sharp knife or a pastry scraper, cut the round into eight wedges; separate the wedges. Triangles are the traditional shape for scones, but you can shape the dough any way you please.  Use a heart-shaped biscuit cutter to make your valentine scones!


Brush the scones with the extra cream and sprinkle with the sugar.

 Bake until the scones are deep golden and a toothpick inserted into the center of a wedge comes out clean, 18 to 22 minutes. Slide the parchment onto a rack and let the scones cool for 10 to 15 minutes before serving.

Thursday, February 4, 2010

S'more Brownies


yup, I mean it.
  s'mores AND brownies.
  together, at last!


INGREDIENTS:

  • 1 1/2 cups all purpose flour
  • 2 teaspoons baking powder
  • 1 teaspoon salt
  • 1 cup (2 sticks) unsalted butter
  • 6 ounces unsweetened chocolate, chopped
  • 5 large eggs
  • 1 1/4 cups dark brown sugar
  • 1 cup granulated sugar
  • 2 teaspoons vanilla
  • 1 cup graham cracker, roughly crushed with your hands
  • 12 big marshmallows  (we also diced 6 additional marshmallows and stirred them into the batter. These marshmallows dissolve when baked, so you can leave them out, or throw them in.  Up to you!)


Preheat oven to 350°F. Butter 9x13-inch baking pan with 2-inch-high sides. Combine first 3 ingredients in small bowl. Stir butter and chocolate in a medium sized bowl over a  heavy  saucepan of simmering water.  Stir chocolate and butter in this double boiler until melted and smooth.


Beat eggs, sugar and vanilla in large bowl to blend.


Stir in warm chocolate mixture, then dry ingredients. Fold in graham crackers and chopped marshmallows.

 Pour batter into prepared pan. Dot with 12 large marshmallows.

 Bake until toothpick inserted into center comes out with moist crumbs attached, about 30- 40 minutes minutes.

Marshmallows will be browned and puffy but will deflate as the brownies cool.  Cool for at least 20 minutes.  It's tempting to cut and eat them sooner, but it's really worth it to be patient and let them cool completely.  Otherwise, you will need a bowl and spoon to eat them!  Slice with a sharp knife, cleaning the knife with hot water if it gets too messy and sticky.

Enjoy!


Thursday, January 28, 2010

sourdough bread


sourdough

first, the starter...


A sourdough starter is a wild yeast living in a batter of flour and water. 


There are sourdoughs that are centuries old which have been zealously fed and cared for by generations. 


The area you come from plays a part in determining the personality of a sourdough starter. The particular strain of wild yeast thriving only in the San Francisco area of California can alone produce the unique flavor of San Francisco sourdough breads. Your area may harbor a wild yeast with its own exciting flavor.  The one we started in class last week will have that yummy "ORLA classroom #10" essence!


Keeping a sourdough starter is somewhat like having a pet because it needs to be fed and cared for. But its requirements are simple and not time consuming. With a minimum of effort, you can keep one in your refrigerator to use whenever the impulse strikes. Unlike more traditional pets, you can put your sourdough starter “on hold” by freezing or drying it. And like that ancient Mediterranean baker, you can capture a wild yeast at any time and create a new starter that will be ready to use in a few days.


In a 4-cup jar or plastic container, blend 1cup flour with 1cup water.
(If your tap water is treated w/ chlorine, let it sit out overnight before mixing w/ flour.  Or use bottled water)
Mix with a fork until all lumps are gone.  It should be the consistency of pancake batter. 
That's it!
Now just let it sit in a warm spot with a lid sitting loosely on top.  Do not seal it closed, as the yeasts in the air are what you hoping to attract.
Stir once or twice a day for the first two days.  You should begin to see some action, like bubbles or foaming.  

This is a good sign.  By about the third day you will begin to notice a yeasty, sour smell.  It is ready to use.  


{If you are not ready to bake with it, transfer it to a clean jar and refrigerate until ready to use.  Stir 2Tbsp flour in to feed it once a week.   To reactivate after refrigeration, let sit out for a few hours at room temperature then feed it another 1/2 cup flour and 1/2 cup water.  Sit in a warm place until bubbling action resumes.  Then, it's ready to use again.}


Stir your starter before measuring out amount to put in your recipe.  After using some of it, replenish the jar by stirring in 1 cup flour and 1cup water and letting sit out until bubbly.


 for 2 large sourdough loaves:


1 cup starter
1 cup water (lukewarm)
1 Tbsp sugar
2 tsp salt
3 - 4 cups AP flour 


 In a large bowl, combine starter, water, sugar and salt.  With a wooden spoon, stir in 2 cups of flour.  Then add 3rd cup. 
 As dough gets thicker and harder to manage with the spoon, begin to knead it by hand.
 It will still be sticky, but add flour now only a bit at a time until it is completely incorporated.  You may only add about 1/2 cup more, maybe less. 

 Remember how the dough felt in class when it was well-blended.  It will be moist, but not sticky.  It will hold together and get smoother as you gently knead it.  Keep kneading for 5 minutes.

Place in a bowl, cover with a warm, moist dish towel or plastic wrap, and set in a warm place for 4 hours.


Remove from bowl, deflate and cut in half.  Now you have two loaves to form.  Flatten dough with fingers:


roll dough from bottom up:


then pinch the seem tightly closed all the way across


Now place loaves on a baking sheet lightly sprayed or lined with parchment paper.  Cover again with towel or plastic and let rise for one hour.
Preheat oven to 425 degrees.  Use pizza stone if you have one.


spray loaves with water, and make scoremarks with a sharp knife


 Spray the insides of oven quickly with water and bake loaves for approximately 20-30 minutes, turning pan every 10 minutes.  Loaf will be golden brown when finished (though check the bottom, which may brown faster).

yum-yum, hot & sour!